Revisiting antlers in decor


 In 2014 I wrote a post about the popularity of antlers in home design:  I had reservations about their overuse.  Whenever anything becomes too popular I am automatically reticent about employing the trend in my own home or  the homes of clients.  I decided there was a middle ground when it  comes to using antlers in an interesting way  as described in my initial post.


My antler gift finally moved indoors this summer once I decided it was suitably bleached.  The other one  was left in the flower bed.   Once moved inside it took up a  nomadic existence as you can see from the photos below.  You never knew where it would turn up.

 trunk, beach house, antlers  and candles

On the trunk in the living room for an evening of company when you want some ambiance.  The antler served as a place holder for the remote start candles.  I love this invention;  they flicker like real candles, smell like real candles and you don't have to worry about fire.  Thanks Costco!


antler and candles, beach house, handmade dining table


Or on the dining table if you want to use the the trunk for food or drinks.

or

as part of a console table vignette.

console vignette, antler, beach house, Home and Cabin

Our summer place was featured  in a local design magazine called Home and Cabin.  I needed an organic shape to add dimension to  a  vignette I created for the shoot.  My antler was perfect in scale and form.  It almost looks like writing and relates well to the other collected items on the tabletop. 


glass container with rope, antler, bleached wood floor

And when not in use, it resides on the floor in the corner  ready and willing to leap into service when called upon. 

I saw this  Fall application today on Pinterest and it gave me a new idea for Christmas.  Guess I'll be dragging antlers to my city home next month! This works so well because everything is bleached even the table top.  Did I mention I love bleached wood

antlers centrepiece, white hydrangeas, white pumpkins, bleached wood

Perhaps you have an antler in your life and have ideas for  its use.  I would love to hear from you. 


Thrifty decor: Bring on the green

Do you like a little nature inside your home?

Do you love to find something that looks good and costs little or nothing?

Do you like quick  pops of texture and colour ?


ferns, sea urchins, pottery, beach decor, summer house
Barnacle vessel by Anita Singh


Then think ferns.  Wild ones, the ones you see growing in the woods or other damp places.  They are  a constant in my summer decor mostly because I don't have ready access to cultivated options and also because I love to create interest and a homey, nature inspired look without spending money.


Living on the edge of the ocean, in a meadow with thick woods behind me is the perfect spot for foraging for bargain accents.   I often combine sea related objects, some found and others hand crafted.


ferns, sea urchins, pottery, beach decor, summer house


Another trick I use is to continually move around objects I have to create new looks.  My summer place is small and there isn't a lot of storage for "accessories".  The candle replaced the sculptured vessel in the photo  above.   
.   

ferns, sea urchins, pottery, beach decor, summer house

 Then an old oil lamp replaced the candle.  So three objects different heights, different textures and different shapes is a simple formula for display.  Another trick is to mimic the shape of the table in one or more of the objects.  The circle is repeated a number of times in this vignette.


ferns, sea urchins, pottery, beach decor, summer house


As the ferns started to wilt,  I removed them and cut some grasses and alder leaves to flesh out the display and moved it to another spot.  Leading the viewer's eye is another great trick to use for simple displays.  Your eye pops from the rope ball, to the bouy and then through to the ferns and lamp.  Again I have different textures, heights and shapes.  The added texture of the lamp base and the table creates a very inviting vignette.  

If you don't have a meadow or woods near you buying several ferns at the florist has the same effect.

Do you have a favourite go to wild plant to use in your  arrangements?


A Room Makeover for my Girl

Oh my heavens....when we started this room makeover it wasn't going to be all this but boy O boy are we glad it is!
It was a few months back that my middle girl had said..."Mama, I really want a girls room" Which in a way surprised me because in my mind she had a "girls room". But when one of my kids wants to change things up with the design of their room, I'm all about it!
I started exploring some options for what would make her room girlie but not tacky! If you know me at all, I just can't get on board with too much color or too much fluff! But I wanted her to feel comfortable in her room and I have always tried my best to listen to their requests when it came to designing their spaces. It is her room after all and she deserved a space that reflected her personality. The original styling of her room was a lot of primary colors with a white background. Colors that could be easily changed out over time and it wouldn't affect the design of the space. But when she said she was tired of that black and white sharpie wall, well that was all the push I needed to completely rethink the entire design!

So long Sharpie wall....you were great while you lasted but we were moving on and oh my goodness we did!
With this wall painted I knew I wanted to use wallpaper in its place.
That's when I found Chasing Papers Peonies...and I knew it was going to be absolutely perfect!
Can we just talk for a second about the ease of putting this wallpaper up on the walls! It was so simple...full tutorial to come but take my word for it...once you start you are going to want to put Chasing Paper wallpaper in every room because its that easy!
Once the paper was up we started on planking all the walls and the new hardwood floors and after a month of my kiddo sleeping in the loft, it was finally finished!


One of my favorite additions to her room is this 5 foot tall sign. Hand lettered by my sweet friend Aedriel and created by the House of Belonging. We thought about hanging it but I just loved how it looked leaning here up against the wall. My girl has been an adventure since the moment she was born. She gave us quite the scare her second day in this world when she was rushed to the NICU by ambulance for high levels of jaundice and we spent the next ten days in the hospital praying and waiting for her to get well. Thankfully she turned out just fine and has been a firecracker ever since! 
The design on her dresser was a DIY that I did after seeing another dresser very similar to this. I really wanted to keep her room in budget so buying new wasn't an option.  So I got to taping and painting and here is how it turned out! 
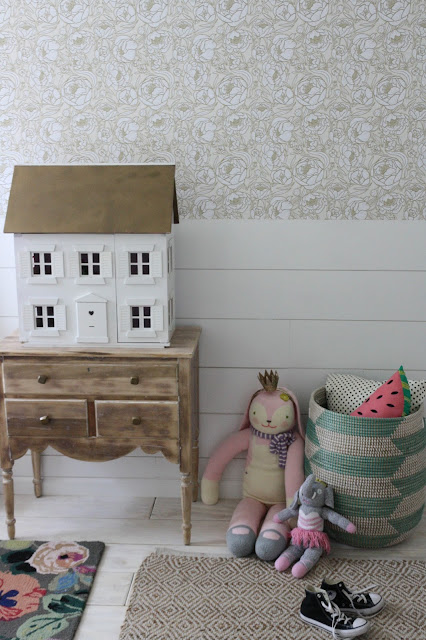
This little Goodwill dollhouse will always be one of my best finds! 

The best part for me when I have an opportunity to create a new space for one of my girls is the happiness I see on their faces when they finally get to walk in to their brand new room. She squealed when she walked in here for the first time and said..
"Oh Mom, did you do all this stuff for me because I love it!"
Best feeling! Not to mention every time I get to work on a project like this in our home, I get to work with my husband and its kind of our thing that we do together and we're not so bad at it. 

Below is the complete source list for her room with links...

The bed is vintage {it was mine when I was a little girl} but HERE is a similar one. 
Small wooden dresser {DIY}
Tassel Blanket is Homegoods
Cream Nightstand-Crate and Barrel but discontinued
Dollhouse {Goodwill} similar HERE
Large Dresser {DIY} but the original is HERE


Crushing on Juju Hats

The Juju Hat.
It has been something I have obsessed over for quite a long time. Lets just say I have wanted one ever since I saw this image above and I couldn't get it out of mind. Notice the mantle! This space is designed by the uber talented Katie Hackworth and I have looked to her for inspiration for quite some time now because well, she's just down right amazing.
I have always struggled with what I wanted to put on my walls. Art isn't my strong point and I used to really struggle with choosing the right things to hang but when I saw this I swooned over the beauty and the history associated with it.
I started to search for one of my own but found out quickly these beauties were not in my price range.
At around $500 each they weren't even close...Ugh! Who else is constantly saying to themselves...how come everything I love always costs so dang much!?? You may say it with better english but you get my point.
So I considered making one....for like a hot minute because honestly it wasn't going to be cost effective in my opinion and over time I have come to the conclusion that my time is worth something.  I have seen how others have made absolutely beautiful DIY ones and even though I love a good DIY this just wasn't for me.
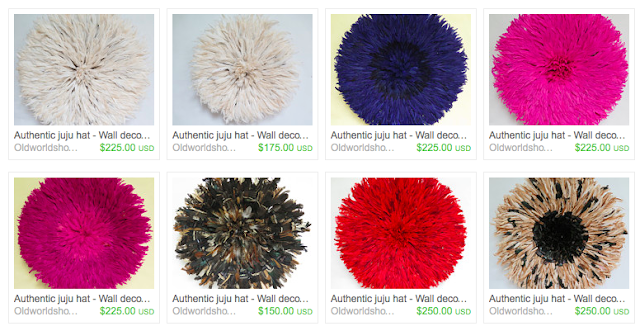
Then after a few years of only dreaming about owning one I found the Old World Shoppe on Etsy and oh my heavens this was what I had been hoping for. Tons of beautiful and I mean beautiful JuJu hats and they were literally half the price of the ones I had previously found on other sites.

You really can't even imagine my excitement. I bet you actually can if you know me at all and it was through the roof! The Old World Shoppe shipped it directly to my home and I don't know about you all but I am a huge stickler for packaging and how things are shipped. My Juju Hat was packaged so tightly and was delivered in perfect condition.


It actually took me a minute to figure out exactly how to open it because I was so scared of breaking it but once I realized you simply push the bottom inward it opened up like a gorgeous white flower.


I love it! It is one of my favorite things in our home and it makes me so happy to see it hanging over our mantel.

The feathers are full and beautiful and I think it's simply perfect! 
It is a real statement piece and I can't even tell you how many guests ask "What is this and where did you find it!?" It's such a fun element in the design of the space. It really completes it for me. 
The Old World Shoppe was so amazing to work with and they are even giving all House Seven readers a coupon code for 10% off each Juju Hat order!! Just use the code HOUSESEVEN to receive your discount. Enjoy!

DIY Shibori Indigo Tea Towels

I may be late to the trend....per usual, but maybe you are just hearing about it too?
I'm talking about Shibori Indigo dyeing and I'm sort of crazy about it. If you have been following my Instagram recently, you may have seen how I just scored some amazing Hmong Indigo fabric from Thailand that I made pillow covers out of. I really love the pop of Indigo in here and so I'm in the process of experimenting with different ways to incorporate it through out our home.

My idea was these amazing tea towels that keep popping up everywhere!!

Shibori is actually a Japanese technique that involves twisting, bunching or tying fabric along with using wood blocks and rubber bands to create patterns and dyeing it with Indigo dye. The possibilities of design pattern's are endless. I used this tutorial HERE as a guide along with the instructions on my dye kit.


I purchased the dye kit HERE and I also used two pieces of scrap wood tied together with rubber bands as my stir stick...I had to get creative since I needed a long one and didn't have anything else on hand.
Reading the dye kit instructions beforehand, I knew that I needed a 5 gallon bucket for the process...now I will say, I could of used half the amount of the kit but live and learn...so next time I will only use half of the ingredients at one time and save the rest, since I really didn't need 4 gallons of dye!

Down to the basement I went.....Here we are mixing the Indigo dye and other ingredients. The key here is to not splash around the mixture but stirring slowly to keep as little oxygen as you can from entering the vat.
After mixing, I covered the vat of dye for 1 hour. Again, even after reading the directions through ahead of the time, I did miss the fact that I needed a bucket with a lid so this was my solution...not pretty but functional.
One hour later and here is my dye. You can't tell in the photo but the dye will appear a dark green or greenish yellow in color. You have to take the 'flower' off the top before you begin to dye. This is the collection of residue that sits at the top. I scooped it out with a plastic dish and set it aside. You also need a clean bucket of water to rinse your fabric in after you have allowed it to oxidize. 
I still have my vat sitting in my basement because if you keep it covered the kit says it will last several days....I will have to update you on how I dispose of it. 
After I let my tea towels dry on a rack all night, I washed and dried them to keep them from bleeding. 
I LOVE them! 
This is definitely one of those DIY projects I can see myself doing from now on. I've been thinking about everything else I can dye with this technique. It's messy if you're not super careful but so easy and the results are quick! That's my kind of project!


 I've already decided that this is going to be one of my favorite gifts to give out this holiday season...so if you know me, don't be surprised when these end up under your tree this year! I also think they would make beautiful house warming gifts! Oh and I do have quite a lot of friends having babies right now....Shibori Indigo baby jammies maybe?


Copyright © 2014 | Design By: Home Inspirations