Showing posts with label DIY. Show all posts

7 Tips for creating a DIY summer house

March is the month when my heart beats a little faster because spring is on its way and opening our summer place begins to be a reality. Each year at this time I plan what the coming year will bring in repairs and DIY projects.  This post summarizes some of our past projects and how they have come together to create our special place. It is modest and quite ordinary looking when viewed from the outside, but  we have a million dollar view, and an interior that reflects our interests and skills.

 We are perched on the edge of the Atlantic Ocean on the Bonavista Peninsula in Newfoundland and through the seasons we see icebergs, seabirds, whales and beautiful full moons.  One October I even saw my first display of the Northern Lights. Come along for a virtual visit to Ryall's Seaside Home and Studio.


View outside the studio window mid summer


After the storm

Full moon over Bonavista

It's a magical place and it hardly matters what goes on inside, but over our years here things have evolved to reflect who we are and what we think is important.  While some things happened because of  circumstances and individual interactions, many of our decisions were based on principles we considered important for us. Perhaps you will find them helpful if you are starting on a summer house adventure. 

Look outside for colour scheme inspiration 


Before we ever put plans on paper, the colour scheme  was etched in my mind because of the time I  spent in the community when I was younger.  The inside is a continuation of the outside - ocean, pink slate, meadow, beach and fog. It goes without saying that you need to do all the painting yourself!


 The slate helps tie the colour scheme together and references the  prominent hills visible from most of  the windows.   I choose  purple (taken from the slate) for an accent wall behind the cabinets  and on the wall behind the dining table. I'm not fond of accent walls, but I felt the room needed a bit of energy, and paint is always an inexpensive way to create effect.  I also used colour blocking as a way to transition from room to room and create visual interest in this small space.   To me it feels like a walk on the beach with the slate hills backing the ocean. 

Decide what's important


The whole  floor plan revolved around the placement of my art studio to avail of north and east light. That left our kitchen area very compact, centrally located but quite functional given its size. There is also a built in buffet opposite the kitchen and additional storage in a pantry closet.  Our splurges were the slate floor and the butcher block counters, so the cabinets were built on a shoestring budget using shelving laminate and doors purchased at a salvage store.  They were finished with a colour wash and varathane.

The  wood floors are local spruce stained with the same wash, and protected by five coats of water-base varathane. They have held up exceptionally well considering we never remove our outside footwear. 

After 13 years the cabinets started to turn very pinkish  and I repainted them this past year with Benjamin Moore's Advance in Winds Breath  (one of my favourite dirty whites).  At the same time I painted out the accent wall and promptly changed  it back.  It just wasn't the same space without it.   So much for refreshing my decor. 

summer house, DIY kitchen, BM winds breath, stained glass transom
Designing Home: Kitchen cabinets BM Winds Breath 

Decide what you can do yourself


 You would be surprised what you can do yourself with a little help from You Tube!  Make a list of the things you are willing to do and get yourself educated if you can't do them already  We laid our own tile and slate, put down the wood flooring and finished it, painted every room and made  and installed the door and window trim.  That was all before we started to make or alter furniture. 


Use your skills to create unique pieces 


Everyone has interests and skills that can be used to create individual, unique spaces. Use them in your own space. My friend is a quilter and when I go to her house, that shows.   Our particular skill set is art, stained glass and carpentry. My on-site handyman/partner created the  beautiful stained glass  over the refrigerator to let light from the porch area flow into the central kitchen.  His handiwork continues in the dining area. 

stained glass in driftwood, seaglass construction, reclaimed wood table, summer house
Designing Home: Table from reclaimed wood


The table  and bench were made from lumber salvaged from a hundred year old building being demolished.  The dining area is across from the kitchen and the purple accent wall continues.  Our mid century modern chairs were saved  from a trip to the dump when a local company was renovating their offices.  You can probably tell we are not interested in perfectly matched sets of things.  

My frequent trips to the beach has resulted in a soaring sea glass collection. Apart from storing it in a large glass jar, I wanted to highlight the range of colours and shapes in a sampler.  You can see the end of it under the painting. The stained glass piece beside the window is reminiscent of the various ocean colours outside the window.  The driftwood came from a local beach. 


Consider function first


I still can't believe I bought this sofa and chair! It is cuddly, puffy and brownish - not at all what I am attracted to. Function won out over all my aesthetic beliefs. I gave up on my dream of a white slip covered sofa as not conducive to gardening, wood working, hiking and painting.   This one was durable and cheap.  I'm learning to like it.

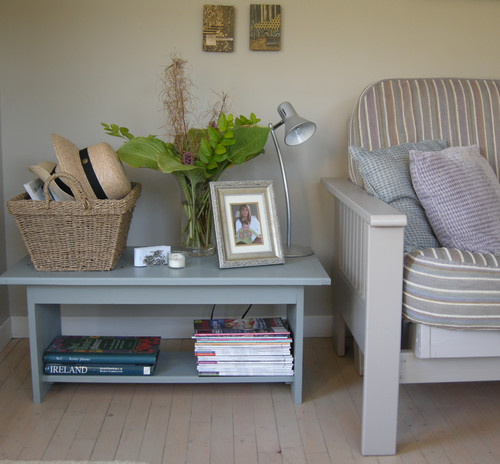
The trunk was built by my father when I was a teenager; he was a thrifter too. It is a coffee table, storage space and ottoman all rolled into one.  


Use your interests to accessorize 


The most interesting objects in your home are always the ones that reflect the interests and individuality of the people who live there.  Going to a big box store might give you lots of options and showcase interesting objects, but  without connections your purchases will look flat and sterile. 


This vignette sums up our summer lives and connections.  The lamp is a cast off from my daughter, and it needs a lighter, textured  shade that will come in time.  The antler was picked up by a friend on a hike along the hill that backs our house.  It sat outside for years and is bleached and subtly coloured.  I love the rhythm of it with the other natural references on the table top.   The jar contains large shards of pottery collected from  beaches in the area.  The carved sea gull is a pal for the ones that constantly swoop outside the window. The assemblage was created from bits of wood from beach walks over thirteen years, and we love our local birds, trees and wildflowers.


From pussy willows to a boot remnant each object on this  studio table has a connection to me. The books reflect my art interests.  My sister gathered the pussy willows for both of us.  The starfish is another ceramic love, and the colour, texture and shine work nicely with the natural materials around it.  A visiting friend was  beach walking and found the plastic glasses frame and the side of an old leather boot and gifted them. Their presence reminds me of the changes that the passage of time creates in the world and the importance of friendship.


Look at old things in new ways 


 This table was left over from the days when covered tables were all the rage. I quite like its broom handle style  legs and I love circles.  Obviously it had things going for it in my mind. I used left over paint from the house and tape to create a bullseye pattern;  the pattern adds a little punch of energy wherever I place it. It's not all savings in our house, fine craft and original art are my weaknesses. Remember the adage above, decide what's important. 


The dresser in our bedroom was purchased at a second hand store.  I described its transformation here.  I just knew it would be spectacular in gray.  Warning:  Sometimes new hardware can cost more than the original purchase.  The lamp was remodelled from another second hand purchase and it's transformation is in my previous post. The beach assemblage is one of my current pieces. 


Designing Home: Bedside table from hotel furniture 


When we built the house, a second hand store we frequented had a whole stock of night tables from a hotel that was being refurbished. They were solid wood, right down to the dovetailed drawers.  Unfortunately they were a harsh brown with a laminate top and black metal.  Look what a little re-visioning can do. Stix primer will adhere to anything, and spray paint is my go to for metal. 


Designing Home: Repurposed louvered doors  

Our main bathroom didn't  have any storage, but it had a small alcove area.  We reused  the top half of  louvered closet doors  from out town house to create a cabinet for cleaning materials, supplies and extra towels etc.  It also provided a place to display more of our objects from seaside life and travels. Check out more louvered door ideas for summer homes in this post.


Designing Home:  Studio table from computer desk 
My studio is an accumulation of bits and pieces of altered furniture to suit my needs.  My painting desk is an old computer table with a rolling cart pushed under it for storage. Over the years the  table top became stained with paint so I covered it with a vinyl adhesive. It is so much more restful than the black one.  Its placement  under a window allows for optimal scenic view and light for work.


This table started out as one of two built -in night tables for my daughter's bedroom over twenty five years ago.  It has had three lives since then.  It was just the thing to bank each side of the futon in my studio.  Love furniture you can paint especially for an informal summer look.  I also like the extra storage for books and the large top for display and some handy storage.  Our two hats kept falling off the closet shelf so now they have a new home. 


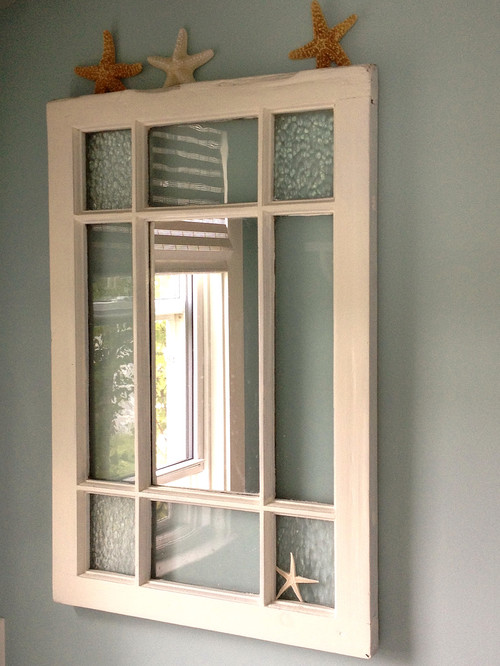
A friend asks for your help and you come home with a gem.  This old stained glass window was headed to the dump, but my husband knew it would serve some higher purpose.  We removed the broken coloured glass and replaced it with clear textured glass and added mirror to the middle pane.  It is one of my favourite pieces in the whole house.  

And there you have it, 13 years of re-inventing materials to create a relaxing, cozy, budget friendly summer house. 

Seaside DIY lamps

 My summer house is casual, softer edged and more DIY than my town home. Its decor  reflects its location and   our budget  restrictions for a second home.   About 75 % of the furniture  is built or adapted by my seriously skilled hubby or purchased second hand.   It goes without saying that when  I decide I need something to fill a spot, second hand stores are my go to solution.

 I added new art work in the master bedroom last year and I knew I couldn't keep the current lamp arrangement because the art was too commanding and the lamps too mismatched and small.  But I sure did like  my jar of pussy willows.


 I was appalled to realize I had this  small lamp for 13 years and I never did repaint the night tables.
 This is a perfect example  things in a home you are going to address and never do.  


Moving right along,  I moved the pussy willows,  got the night table painted, and mounted the artwork.  You can see the problem with the lamp; it is totally minute and  doesn't connect in any way with the art work.   I wanted something with more substance and felt it needed to overlap the artwork slightly.


I found two of these  frames  at Value Village.  I liked the fact that the base looked a little like a fish and the top was boat shaped. It had strong lines and wasn't fussy.  Of course the price was right.

 But black wasn't going to work in my seriously beachy feeling home.


A little painter's tape and then my trusty  Krylon stainless steel spray paint came to the rescue.    


I made the  lamp shade out of paintable textured wallpaper and adhered it to the metal frame with two sided carpet tape. The paper had lots of heft  and added a bit of texture to the room; it was also cheap because I had some in my art studio. 


And after all that I decided I would put new bedding on the 2016 purchase list, something much lighter, and the dresser will be repainted a lighter  BM Edgecomb gray.  The walls are BM Revere Pewter, and have been the same colour for 13 years.  Long before gray was a trend and it will be gray long after it ceases to be a trend.

Oh yes, the wood assemblages are  temporary because they are going in an exhibition this summer so the lamps might be very lonely, hopefully forever. 


DIY Shibori Indigo Tea Towels

I may be late to the trend....per usual, but maybe you are just hearing about it too?
I'm talking about Shibori Indigo dyeing and I'm sort of crazy about it. If you have been following my Instagram recently, you may have seen how I just scored some amazing Hmong Indigo fabric from Thailand that I made pillow covers out of. I really love the pop of Indigo in here and so I'm in the process of experimenting with different ways to incorporate it through out our home.

My idea was these amazing tea towels that keep popping up everywhere!!

Shibori is actually a Japanese technique that involves twisting, bunching or tying fabric along with using wood blocks and rubber bands to create patterns and dyeing it with Indigo dye. The possibilities of design pattern's are endless. I used this tutorial HERE as a guide along with the instructions on my dye kit.


I purchased the dye kit HERE and I also used two pieces of scrap wood tied together with rubber bands as my stir stick...I had to get creative since I needed a long one and didn't have anything else on hand.
Reading the dye kit instructions beforehand, I knew that I needed a 5 gallon bucket for the process...now I will say, I could of used half the amount of the kit but live and learn...so next time I will only use half of the ingredients at one time and save the rest, since I really didn't need 4 gallons of dye!

Down to the basement I went.....Here we are mixing the Indigo dye and other ingredients. The key here is to not splash around the mixture but stirring slowly to keep as little oxygen as you can from entering the vat.
After mixing, I covered the vat of dye for 1 hour. Again, even after reading the directions through ahead of the time, I did miss the fact that I needed a bucket with a lid so this was my solution...not pretty but functional.
One hour later and here is my dye. You can't tell in the photo but the dye will appear a dark green or greenish yellow in color. You have to take the 'flower' off the top before you begin to dye. This is the collection of residue that sits at the top. I scooped it out with a plastic dish and set it aside. You also need a clean bucket of water to rinse your fabric in after you have allowed it to oxidize. 
I still have my vat sitting in my basement because if you keep it covered the kit says it will last several days....I will have to update you on how I dispose of it. 
After I let my tea towels dry on a rack all night, I washed and dried them to keep them from bleeding. 
I LOVE them! 
This is definitely one of those DIY projects I can see myself doing from now on. I've been thinking about everything else I can dye with this technique. It's messy if you're not super careful but so easy and the results are quick! That's my kind of project!


 I've already decided that this is going to be one of my favorite gifts to give out this holiday season...so if you know me, don't be surprised when these end up under your tree this year! I also think they would make beautiful house warming gifts! Oh and I do have quite a lot of friends having babies right now....Shibori Indigo baby jammies maybe?


What to do with louvered doors

 I have a love hate relationship with louvered doors.   I like the free flow of air into closets,  but I dislike all the vertical lines and fussiness.   Many houses built in the eighties sport this type of door.  We have removed some of ours and replaced them with a contemporary looking slab door more in keeping with the streamlined look I like, and we decided to update others.  


And here's the last remaining set we have just waiting for a facelift.....

How to update louvered doors

Designing Home: Updated louvered doors 


All you need is 1/8 inch MDF or plywood  (some doors may have enough room for 1/4 in. ) and construction adhesive, (PL Premium is my favourite). 

 Lay the doors on a table or bench and measure the size of each panel area.  Cut the wood  to cover each  louvered panel section,  add a dot of adhesive every third slat next to the border and press the wood panel in place.  It should fit snugly, if not you can always caulk any seams before painting.

Use clamps or add something heavy to hold each panel in place and let it dry overnight.  Add new handles of your choice.

Reusing louvered doors for new projects 


When you remove the doors in favour of new ones you are left with two perfectly good doors that need a new life.  

Designing Home: Louvered bathroom cabinet


Here's the cabinet my husband made for our summer house  from the top half of two closet doors.  It nestles nicely into a small alcove in the main bath and holds things you don't want on display. It also gives you a great surface for changing vignettes.  We decided against hardware because you can easily open by using a louver as a pull.  It also gives it a more contemporary feel. And now what to make from the bottoms???

There are so many creative ideas for louvers on Pinterest.  I admit that many of them have a very country or beach feel to them,  but if you crave a more contemporary look there are ways to achieve it.

These are my top three faves:

Headboard 

source

Painting the louvers  black  the headboard  a very contemporary feel that I quite like.


This treatment is much more country, but could be updated  if they were painted charcoal and the bedding was adjusted accordingly.


Sofa table 


The straight lines of this table make it suitable for any decor. Colour and what you put on it can automatically update the look.


Standing Shelves 


Jessica Monroe

If you wanted this to have a more contemporary feel you could paint shelves and sides the same colour and add plain crown to the top and bottom.

So many creative uses for louvers.  I love to see materials getting a new life!

Reclaimed wood works


 Old is good. What is old can be new again with a little ingenuity, and I don't mind admitting that the art side of my brain has lots of that.   I think reclaimed wood  is beautiful, and this summer I made great finds on the beaches near our summer house.

Are you wondering how this connects to decor?  Keep reading!

reclaimed wood Newfoundland
Atlantic Ocean beach wood
 Storm tossed and sea sanded house/shed remnants  were dragged home against my better half's judgement. At the time I answered the strong call emitted by these materials, but  I didn't know why I needed them.  My art often begins with the call of materials rather than with sketches and preconceived notions of a final product.

 Margaret Ryall Duntara workshop
Not a pretty site/sight
No this is not the home decor section!

Move over hubby,  I am taking possessions of your precious workshed and tools.  Yep!  I know my way around drills, bandsaws, chopsaws and sanders and I discovered construction adhesive will stick most everything together. Drop paintbrushes, fine papers and canvas.  I have a new palette and perhaps a new series for exhibition.

This one is my keeper.
Reclaimed wood assemblage Beach Quilt Margaret Ryall
Beach Quilt, Margaret Ryall, 2013, reclaimed wood
 And here it is in the back entry of my summer house.  I have to wait until May to see it again (and take some decent shots of it).

You've reached the home decor part
Stay tuned for more creative moments in my life.  What have you created for your home lately?

What a coat of paint can do!

I love eclectic pieces of furniture rather than matched when I decorate my own home. Sometimes I paint these finds and other times  I strip the original finish and create a custom wash . 

  We recently had to replace this green washed oak  dresser in our summer house when we relocated  it  to our newly renovated master bedroom  in town (that will be another post).


We bought this gem  at  Habitat for Humanities Restore for $20 dollars when it passed my husband's structural integrity test being  pronounced solid and square with good sliding drawers. Sometimes being married to a wood worker can become tiresome.  I liked it  because it had great lines. 

 The walls of this bedroom have been  Ben Moore Revere Pewter for ten years.    I wanted the ocean view  to be the focal point so I choose a colour for the dresser  that was just a little darker than the walls.


  I sanded liberally and primed with Ben Moore Advance Primer.  The colour is  Ben Moore CSP upper west side (Aura). I love this gray as much as I love Revere Pewter.  I think Revere Pewter is the perfect gray so that is quite a standard to match. I'm still debating painting the legs. They blend in with the floor and the tips are gold.  My current feeling is leave them because gray would accentuate the gold tips.

I have to admit that the knobs and handles  purchased at Home Depot cost 4 times the price of the dresser, but they were a must to keep the mid century modern feel of the piece. 


Copyright © 2014 | Design By: Home Inspirations